 will stedden
Notes on Bike Fixes
I've been hanging out at Bike Kitchen in SF for the past couple of weeks. I previously wrote a little something about replacing a bottom bracket. Below are my notes on a few more key fixes.
Front Derailleur

With the new derailleur, you first need to get it in the right place on the tube. You want it lined up with only a few millimeters of clearance above the largest gear. The derailleur I used had the shifter line wrap around from the underside. It fastened at just one spot despite the oddly shaped nut.

Afterward it was attached I just had to align the derailleur as normal.
Chain Replacement
My chain had been jumping hard for a while, so this was the next most important change needed. I was pretty sure the chain was shot, but the way to check for sure is to use a CC-32 chain checker, or a ruler. Since the chain checker passed through on 0.75, I needed to replace.

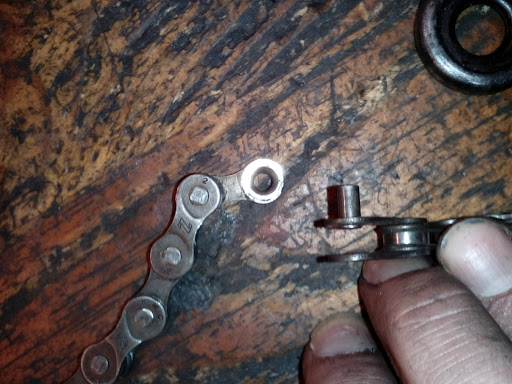
I honestly had never though about how chains get on and off of bikes. It didn't really even occur to me that they had to be taken apart. Getting it off requires a specialized tool, aptly called a chain remover, but isn't that difficult once you have it. You line the tip of the remover up with the pin in the middle of one of the links and turn the handle. The pin remover applies pressure and the pin starts to slide.

Keep in mind that it's incredibly important not to let the pin come all the way out on a part of the chain you really want to keep. Once the pin is all the way out it's very hard to get back in, and you normally end up needing to remove that link entirely and starting on the next one.

You need to put the new one back together on the bike because it has to thread through the frame and derailleurs.
Hub Overhaul: Cup and Cone
The most interesting and satisfying fix came from a relatively minor problem. The hub of my back wheel had a little more play than it should have . To fix this I needed to perform a hub adjustment (aka cone adjustment), but since I was taking the hub apart anyway, I decided to do a full overhaul at the same time.
I started by popping the nuts on one side of the hub off. I took them off of the side with the gearset, but either works as long as you only take off one. Inside you can see the bearings along with some filthy grease.

I cleaned the bearings and cup and cones from both sides, making sure to replace any bearings that had significant wear. Basically bearings with any obvious dent in the surface got switched out.
 With everything clean, I reapplied gobs of grease and reinserted the bearings. The grease held the bearings in pretty well while I reinserted the shaft through the wheel and resealed them.
The big trick is when you close up the hub. You want to adjust the cone to be just tight enough to stop any play, but still loose enough that the bearings don't jam up. If you tighten it all the way down you can feel the bearing rubbing against each other. I backed off a little and then held the cone in place while tightening the outside bolt. The external bolt and the cone should lock together to keep the cone from moving.

That's a rack
The bike was running smoothly at this point. But I've been having fun so I also threw a rack on the back for good measure. I'll just need to turn one of my bags into some panniers next!